Introduction
For a while now, I have been exploring affordable, yet high-performance and low-latency solutions for hosting game servers, specifically, Minecraft servers. (I understand that shared Minecraft servers can be even cheaper, starting at just $1/GB RAM, however, I didn’t consider them as I prefer to have total control over my data and infrastructure. They are certainly a viable option for many!)
As a huge fan of Amazon Web Services, I decided to research what solutions were possible on their platform. I had previously run Minecraft game servers on t3 burstable instances; however, their burstable nature meant performance started to drastically drop after I exhausted my CPU credits. Additionally, it was not financially feasible for me to enable T2/T3 Unlimited.
After some research, I discovered Amazon’s new instances based on their custom Graviton2 processors. Unfortunately, the only Graviton2-powered instance type available on the Spot market (which I use to reduce my EC2 costs – more info here) was the M6g general-purpose series. Amazon does, however, advertise these servers as good for “gaming applications”, so I decided to give it a try. Following a few days of testing a Minecraft server installed on an M6g.medium instance, I can wholeheartedly conclude: Amazon Graviton2 is definitely the fastest and cheapest platform to run (most) gameservers on AWS!
So, let’s get started in this tutorial: Running a Minecraft server with Pterodactyl panel on AWS Graviton2-powered instances.
Notes and Disclaimers
This guide assumes you have already created and activated (i.e. added a credit card to) your AWS account. It also assumes basic knowledge of Linux as well as Amazon Web Services, and that you have already installed the Pterodactyl Panel at another location.
It is not possible for me to provide a concrete price estimate. There are many different ways to purchase EC2 instances (such as Spot, On-Demand, and Reserved Instances), with varying prices. And, different regions have different prices for the same instance. I can say that my Spot instance in us-east-1 costs approximately $10/month (excluding bandwidth).
1. Creating an instance
- Log in to the AWS Console, select the correct region in the upper right, and open the EC2 console. Go to the Instances tab, and click the Launch Instance button.
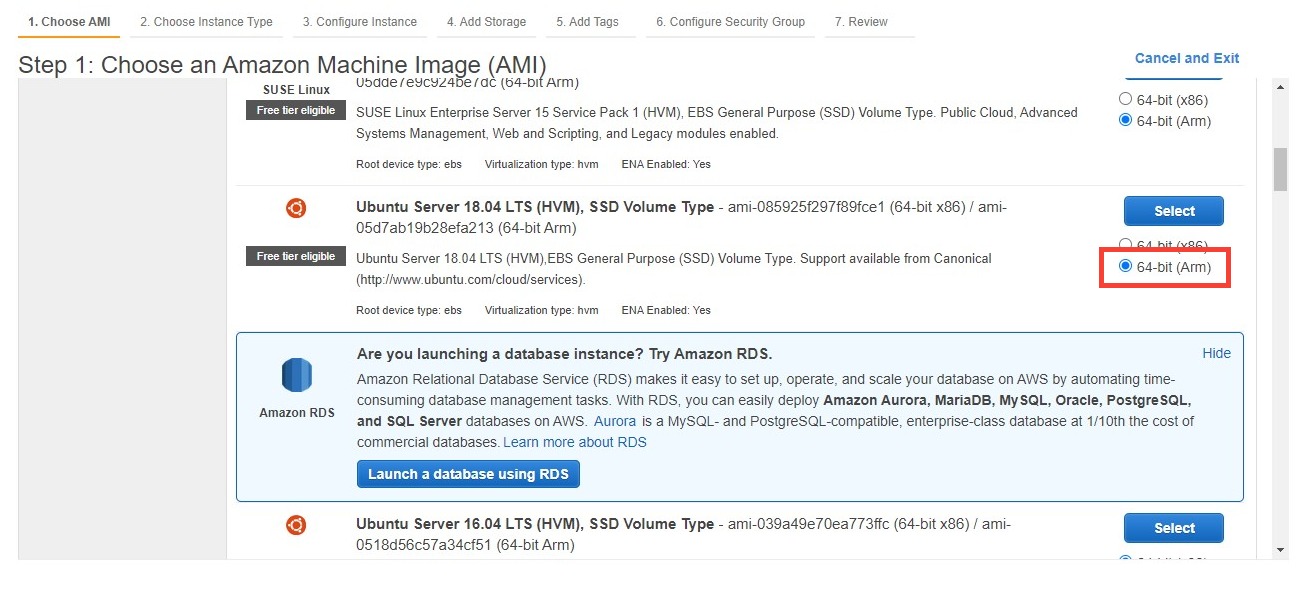
- Select the operating system you would like to use, such as Ubuntu 18.04. Be sure to choose 64-bit (Arm) next to the AMI; otherwise, your instance will not launch!

- Find and select an M6g instance. Click the Next button.
- You can leave the settings on the Step 3 screen as default, and click the Next button. (You might want to select the Spot instances option, which will lower your costs drastically; however, there are other caveats with Spot. Read about it here and decide after learning about it)
- On the Step 4: Add Storage screen, you can leave the storage at 8GB. You will be able to expand the storage later.
- You can leave the settings on the Step 5 screen default as well.
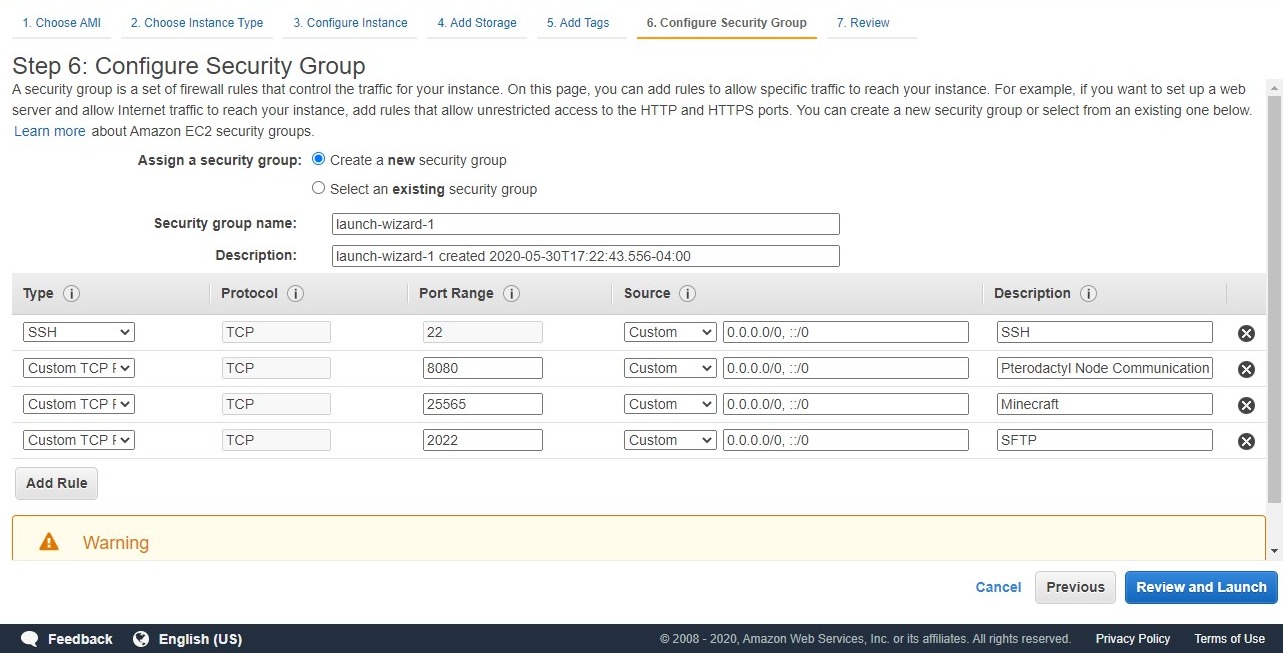
- On the Security Group screen, create a new security group. Configuring this correctly is crucial! Allow ports 22/tcp, 8080/tcp, 2022/tcp, and 25565/tcp, as shown here:
- Then, select Review and Launch and the launch the instance. Congratulations, your instance is now booting up!
- After the instance has booted, you can also assign it an Elastic IP to the machine (so its IP doesn’t change at every boot). However, this is outside the scope of this guide.
2. Installing Pterodactyl Agent
This guide assumes that you have already installed the Pterodactyl Panel at another location.
Since the steps for the installation of Pterodactyl change fairly often, I will just link the documentation for the installation. The steps are quite straightforward and you can just copy and paste, starting at the Dependencies step.
3. Add server to Pterodactyl
Now we will add the server to the Pterodactyl Panel to ready it for the setup of a Minecraft server.
- Add a DNS A record pointing any subdomain / domain to your instance’s IP addresses (which can be found in the EC2 console). For example: mc.example.com
- In the Pterodactyl admin interface, go to Locations and create a new location.
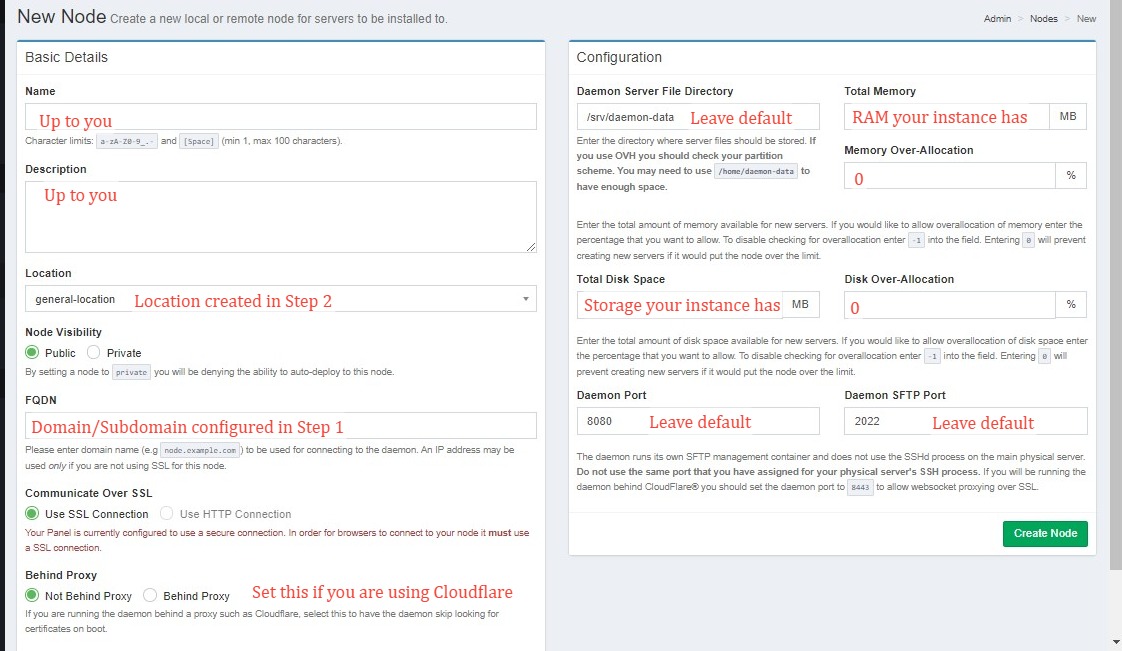
- Now, go to Nodes, and click Create New. Fill in the name and description however you want. Set the “Behind Proxy” option if you are using Cloudflare proxy (i.e. orange cloud) on your domain/subdomain. The location should be the location you just created. Set the FQDN to the subdomain/domain you just configured in step 1. Set the Total Memory to the amount of memory your instance has in MB (e.g. a m6g.medium has 4096 MB), and set overallocation to 0. Total disk space should also be the amount your instance has (e.g. 8GB = 8192 MB), and set overallocation to 0 also. Leave the daemon ports as default.
- Click Create Node.
- Open the details of the node you just created and go the Configuration tab. Copy the entire configuration file to the
/srv/daemon/config/core.jsonfile on your EC2 instance. Then, restart the daemon on your instance by doingsudo service wings restart. Go to the About tab in the panel and you should be able to see the details of your instance. - Now go to the Allocation tab. In the Assign New Allocations section, put your instance’s private IP (which can be found in the EC2 console) in the IP address field, and enter 25565 in the Ports field. Then click Submit.
4. Set up Minecraft server
Finally, let’s set up a Minecraft server!
- In the Pterodactyl admin interface, go to Servers and click Create New.
- You can enter anything for the name and description. Set the Owner to your Pterodactyl user.
- Set the node to the node you created previously, and set the Default Allocation to the Allocation you just created above.
- You can set the memory and disk limits however you like. 2048MB for both will work fine.
- Leave the Nest and Startup Configurations as default, unless you want to run Spigot/Paper/etc – you can set that in the Egg dropdown.
- This is the important part! Since Pterodactyl’s stock docker images are not built for the ARM64/AARCH64 architecture, they won’t run on our instance! Set the Docker image field to
"unixfy/pterodactyl-docker-images-aarch64:java-aarch64"(without the quotes). This is basically a version of Pterodactyl’s Java image that will run on ARM64 architecture. - At the bottom, click create server.
Now you can exit the admin UI by clicking the button in the upper right, and the new server you created will show in the Server List. Click on it, and click Start. Pterodactyl will magically set it up for you. After a few minutes, you will be able to connect to the server by connecting to: your.instance.ip.address:25565 (e.g. if your instance IP is 1.2.3.4, this would be 1.2.3.4:25565) in Minecraft. Happy playing!
I hope you found my guide helpful and informative. If you find any errors or run into any issues with my guide, feel free to leave a comment below, and I will get back to you as soon as possible 🙂